Lots of progress this past week. I was out at the site Tuesday morning and then again today; upstairs framing is done, temporary power is hooked up, well-water line has been connected to the house, and I met with the electrician to start going over the details on the bid.
From Tuesday morning, here's part of the front wall getting made up:

The pre-attached exterior sheathing is left long, so that after the wall is stood up the sheathing will cover the height of the joists below:

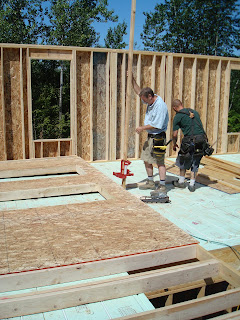
Paul and crew getting ready to use a wall-jack to stand up the wall:
This is the northwest bedroom and its walk-in closet:
 On Thursday, the power company came and installed our transformer and hooked up temporary power. I'm sure the crew won't miss the droning sound of the generator:

I had been envisioning the buried propane tank to be on the north side of the house somewhere (beyond the garage), but wasn't comfortable with the idea since I want to have a gravel driveway in that general location someday. Paul suggested instead locating the tank behind the transformer box (to the right of it in the picture above), which was a good idea. Plus there is still some woods left in that area, so hopefully we can hide it a bit from view. And it will still be easy for service trucks to get to.
The crew had a day off today, but I did meet with the electrician (Joe from Pro Electric) on site this morning to go over rough electrical details. Joe was an easy guy to talk to; we walked around and discussed the details for almost two hours. My philosophy on electrical is simple: one 20 amp circuit per room for receptacle, and 15 amp circuits for lighting. May seem like overkill, but I like to have extra capacity for the future, and I just hate it when you plug in a vacuum cleaner and the lights go dim...although maybe this is just because I've just lived in poorly-wired houses all my life? :) I also specified a four (4) lights plus switch in the crawl space, and 3 lights plus switch in each attic storage space. Two circuits for later exterior use expansion (driveway lights, flagpole illumination, etc) will be installed as well. Kitchen of course will get the appropriate circuits for the various appliances, same with washer\dryer\freezer. Our "media wall" in the living room (fancy term for where the TV goes) will get an extra circuit or 2, as will my low-voltage panel area in my bedroom walk-in closet (I should have planned from the beginning for a dedicated low-voltage or mechanical room, darn it). My office will get two 20 amp circuits (lots of computers, toys, etc). Garage will get two 20 amp circuits for receptacles, and a 50 amp 220v circuit (e.g., for a welder when I buy one), with overhead lighting on different circuits. We walked around the house exterior and I specified locations for an approximate total of ~12 exterior lights. This seems like a lot but these are "average" light fixtures, and the house is pretty big - I reserve the right to add addtional "floods" for when I want to turn night into day :). There will also be at least 4 exterior receptacles. Panasonic fans will be used in all bathrooms and laundry-rooms, and I also asked for a Panasonic fan on a thermostat switch in my master bedroom closet (in case the networking equipment starts to over-heat things in there). (I've never seen or heard a Panasonic fan, but all the contractors I've talked to so far, just rave about them being top-of-the-line machines that you can barely hear when running).
Joe and I also discussed generators. I previously had been looking at Generac systems, but Joe said he normally sells and installs Kohler, and recommended it as being (in his experience) a quieter-running and more reliable generator than Generac. Not having any experience in this area, I'll probably just go with his opinion. He made an off-the-cuff, initial sizing recommendation for the generator (12kw model) but I will definitely double-check the math on that. Bigger is not always better though, beyond initial cost you also have to consider how long your propane tank can run the generator if power is out for a very long period.
Another thing that happened this week is that Brad and his crew (excavation) ran a water line, along with electrical conduit (with a string), from the well to the house. We are not very far away from having water availability:

I wish I could have been there to watch them install the water line, but oh well. In the background of this next picture, you can see the fresh "lane" they made in order to reach the well (and avoid having to dig up the new driveway):
 The upstairs framing was completed yesterday as well. Looking westward along the front of the house:
 We have a big triple-bank of windows in the game room too:
 Panning right from the picture view above, you can see there are three additional but smaller-sized windows also in the game room:
 The extra framing below the three small windows is because they were accidentally framed as large 6' high windows, and had to be reduced in size....stuff happens :).
This is my son Zach looking out from the game room windows:
 And here you can see the game room windows aligned with the living room windows below (I think it will look cool):
 Earlier this week, I also had to make a quick decision on an attic stairway for the main house. With such a large storage space (due to the attic trusses), a traditional 2'x2' access hole just wouldn't be sufficient. Plus, a 9' ceiling is pretty darn high if you are standing on the top step of a step-ladder to get thru the hole! The truss company has to know the rough-framed hole size for the stairway, so they can adjust and reinforce the trusses as necessary. And since Paul needed to order trusses ASAP so they could be here Monday, I had to decide quick. After some web browsing, I settled on a Bessler Model 70 sliding staircase. With the Bessler models, the entire staircase actually slides down from the ceiling, as opposed to a model that folds. This is nice because it can then support higher loads: 600lbs in fact, for the Model 70. Being such a big guy, this is important so that I can actually feel comfortable getting stuff up and down into the attic space. The attic stairway hole will be in the game room, lined up parallel with the joists, and will slide down and to the north (back) of the house. I hope I made a good choice with the Bessler - will not know for sure until the unit is installed, but Bessler is a well-known, American-made brand and has been in business for a long time.
As I said, lots of progress this week. Trusses are scheduled for delivery around 7am Monday morning; I am taking that day off from work so I can be on-site and watch them place the trusses (using a crane, although I believe Paul will have some extra crew available as well since this is a pretty big evolution). Should be fun.
 End view of the garage - check out my attic truss space :):
 Back view of the garage; the small strip of plywood along the bottom is for appearance's sake, so that the open soffits look nice (nicer than OSB would, anyway) from below:
 Good view of how the trusses, fascia, and bird-blocks get installed (this is over the kitchen area):
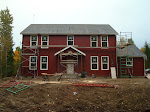
  One of the reasons we drove out to the house this afternoon, was to do some on-site paint color checking. Paul was asking us to choose exterior paint colors soon, so that he can move into that phase quickly. When it comes to color-matching and choosing, I am pretty much helpless (artsy stuff was never my forte - can't even match socks to save my life), and to a large extent I just don't care (I'm more concerned with the structural aspects of the house). That said, my personal criteria for house colors was something that would be semi-traditional for this style of house, and something that would NOT blend into the surrounding woods. We're building a nice house - I want it to stand out when we drive up to it! White is very traditional for colonial style houses, but not our favorite. So anyway, we got a bunch of possible paint samples from a store and took them out to look:
  My initial preference has always been to go with a dark red as the base siding color. After much discussion, my wife is being very kind and is going to let me go with it. Of the samples above, check out the left hand set, bottom sample, right-hand color. The color to the left of it is a nice dark gray\slate, and that will be our accent color. (We're not using the fire-engine red color to the far left, that was too much). A very light gray will be used if we need a third accent color. If you think we're making a huge mistake, don't bother to tell us - paint choices are always subjective, and if we don't like it after a few years, we can always re-paint it! :-)