Sunday, October 11, 2009

Exterior painting started

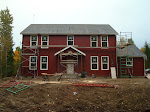
We're enjoying the final gasp of a very nice summer here in the Northwest, and our builder had his guys pushing to get the last of the siding installed, so he could get going on the exterior painting. (While I'm sure painting is possible in less-than-ideal weather, I'd rather they get it on now while the weather is good.) The siding is just about (98%) done - only some covered areas left, like underneath the rear and side porches. That cleared the way for some painting to start:

Ready for a blast of red? Here ya go:

And from the back:

It will look even better once the trim is painted; only a little bit of the side of the house has that done:

Apparently the color we chose (Benjamin Moore Cottage Red) doesn't come in five gallon buckets:

The white trim will be in Chantilly Lace.

In other news, our electrical power was hooked up, so everyone is running their tools off of temporary receptacles in the house. The heating guys also came on Saturday and energized the radiant heating system for the first time. For now it's a temporary job, with the whole house controlled from a single thermostat in the living room, intended to just get the house warmed up enough for the drywall guys to be able tape and mud the joints. So far though I wasn't too impressed - we were out there this morning and the house just didn't feel that warm yet - not what I was expecting from a mega-dollar system like this. Paul called them and asked them about it and they said the system was probably in "limp mode" (?), so hopefully it gets sorted out soon. We did get to hear the reverse-cycle chiller actually running for the first time, and it is very quiet - even w/o drywall in the master bathroom\bedroom, it cannot be heard from inside.

The drywall hangers worked through the weekend but the job is still not quite done, at least as of this morning. Lots of progress, but the house is a real mess at the moment:

The septic system is installed and is now waiting for inspection. I suspect this is a pretty standard setup:

See the PVC pipe coming from the house (underneath the bagged electrical outlet on the wall) - that leads into the left-hand tank, where a couple of baffles separate the #1 stuff from the #2 stuff; the #1 stuff then runs into the right hand tank, via the white pipe in the left foreground. So far everything has been powered by gravity all the way from the house. In the right hand tank though, there is a pump which is float-activated; it is responsible for pumping the #1 over to the drain field, via the white pipe running across the top of the left-hand tank. There you are, more than you ever wanted to know about disposal of #1 stuff and #2 stuff. :-)

We have finalized our tile choices (in fact I need to finish this blog entry and send Paul the list) and are nearly done with the interior paint as well. Most of the interior will be basic linen white, but we're going to put some color in the dining room and my office, just for fun. Both of those room will have some crown molding, and the dining room will get a chair rub rail as well. I'd like to put crown molding in several other rooms as well, but money won't allow at the moment. Overall all things are moving good.

Wednesday, October 7, 2009

Drywall started

I wasn't around for it, but the drywall guys had previously "loaded" the house with drywall and were able to start working today since the insulation was done. For the upstairs, the drywall was boomed in thru a temporarily removed window. This window, in fact:

I started looking at the progress upstairs, and at first it didn't seem like much progress had been made; mostly just the ceiling board in two of the bedrooms...

...but then I finally got out to the garage and realized it was already all done:

Wow - huge difference! :-) Oh yeah, that pallet of stuff in the middle is pretty much 100% boxes of joint taping compound, but I asked one of the drywall guys about it and he said it probably wouldn't be enough to finish the house.

I think that just about catches things up all the way to today. The only other things going on is that we gave final approval for our cabinet layout (our cabinets are coming from a well-known local supplier, Canyon Creek Cabinets), have been working hard to nail down final choices on tile, and are starting to think about interior wall paint colors.

We've also been talking to a local tile and glazing artist, Paul Lewing, about creating some decorative murals for the kitchen and the master bathroom shower. In the kitchen we're going for some, well, kitchen scenes :). (Well, we also might have a small portrait somewhere of our boxer dog Beau who regrettably got sick and had to be put down recently; "Bo-bo", you are still missed every single day!) In the shower, we're looking for a larger scene, something like the Seattle waterfront, with trees, mountains, the Space Needle, ferries, and maybe even a trimaran or two :). We also asked to include some underwater elements - my wife wouldn't let allow me to have any mermaids (even ones with seashells covering the, um, soft parts), so it'll have to be something else, say, a sunken ship maybe, and some fish or something. Clearly this sort of thing is a 100% decorative luxury, but I think it will add a nice touch to our house. More on this later. If you like this sort of thing, I would encourage you to check out Paul's web site - he has done some simply amazing work.

Finally, not to end on a down note or anything, but I do have to admit that I'm starting to feel a slight amount of "house fatigue"...while the progress is exciting, I'm looking forward to actually being able to just live in the house, and not having to spend so much time thinking about details, driving back and forth (some of the road ruts should have our name on them), and deciding on detail after detail. We're getting there though.

Catch-up post

It's been awhile since I posted. Progress did seem to slow for awhile, mainly due to the need to wait for inspections and the fact that the siding is still not done. At this point though, the electrical, plumbing, fire-sprinkler, low-voltage, gas-piping, heating, and framing inspections have all passed. Phew! With that stuff out of the way, it has freed the project up to move on to insulation and drywall - but more on that in a bit.

Here's a cool picture of the main house attic, showing all of the high-velocity A/C air-exchanger in place and all of the ducting. I asked the installers to not string any ducts across the main storage area and they did a nice job:

Did I mention before that there is a total of around 55 A/C ducts in the house? The number is a bit mind-boggling.

One of the more modern code requirements (I think, just guessing) is that every single wall cavity must be sealed tight so that in case of a fire in the cavity, the fire will either starve for lack of oxygen or at least move so slowly that it's easy for people to get out. One day we were out there and there was a guy going around with a huge can of spray foam sealing every single penetration. He was being quite fastidious about it too; I bet it was an all day job. Here's an example:

Note how the side-ways penetrations are sealed too; you can also see a line of white caulk along the corner seam: every exterior corner in the house got that.

The "mechanical corner" has gotten more and more complicated looking:

Here's the generator (on the left) and the reverse-cycle chiller on the right, not hooked up just yet:

Due to some equipment troubles, the hole for the propane tank wasn't due in time and we to postpone that to 21st. So no pictures of the SS Propane Tank yet. :-)

On Monday and Tuesday of this week, the insulation was installed. As mentioned before, I chose a fiberglass blow-in style of insulation throughout the house, including the garage. I wasn't able to be there, but in essence the installers stretch a thin netting over the studs, poke a small hole in it, then stick a hose in the hole and fill up the cavity. Looking at the results today, I was very impressed! The insulation completely fills up the wall cavity and actually bulges out slightly against the netting. Here's a shot of the garage:

Usually in an attic they use 100% loose, blown-in style insulation, but were unable to do that here in our house because of the plywood floors going down the middle of the attic trusses. So that's why you see the more traditional batting installed under the attic floor above. The blown-in stuff will still be installed off to either side of the attic floors.

Here's another insulation picture, looking from a master bedroom closet into the master bathroom:

If you look to the left in the picture above, you can see a little bit how the insulation bulges out. I'm very glad I went with this insulation style! I am convinced that it will be far more energy efficient than the batt-style insulation, since there's almost zero chance of air-leaks this way.

The backside of the house has been almost completely sided, except for the porch area:

Actually this next picture kinda shows the same thing, except that you can see that the garage storage door is installed:

The crew has also finished off the siding on the far side of the house:

I'm sure this wasn't the most enjoyable job on the house; everything has to be done 20-30' in the air on scaffolding which is always a pain. The main part that's left to side is the upper-half of the front, then siding will be done! We are getting very excited to see some more paint on the exterior as well.

Paul made up some decorative dentils for all three porches; here's how it looks on the front porch, I think it will be a very nice touch:


Off to the side of the house, the two septic tanks have been installed but not yet hooked up: