Friday, July 31, 2009

Kitchen area framed

The tubing installers have been working on the second floor tubing, while Paul's crew has been framing the kitchen and other areas on the eastern side of the house. PEX tubes are now dangling all over the first floor:

Most of the doorway sills have been cut out as well, making it easier to walk through the area - it's looking good! (Yeah I know I keep saying that, but it's true.)

This is looking down at the pantry\breakfast\office\laundry room area:

This is one of the tubing guys at work on the second floor; you can see several of the wall plates have been positioned and marked out:

In the kitchen, looking toward the garage; on the left is the pantry, with my wife's office behind it; the small alcove to the left-front of the pantry is for a small desk:

I've decided to bite the bullet for attic trusses over both the garage and the main part of the house. It will be pricey (~$2400) but according to Paul, this price is for live-load-rated trusses! (I.e., live-load can support people, furniture, etc, just as a regular floor can, as opposed to storage-rated trusses which are only intended for light-weight storage - I'm not sure of the exact rating.) This is a big extra cost for us right now, but you can't go back later and change your mind on these things so I'll make it work. Another suggestion was to have a man-door into the garage truss storage space, at the far end of the garage, and build an exterior staircase up to it. This approach would be more convienent than some sort of ladder or pull-down folding staircase inside the garage, and would obviously not eat up any interior space. I may defer construction of the exterior staircase until a later time though. Here's the truss design for over the garage:

Obviously this area will never be used for actual living space, but consider that the garage is 40' wide; so with a 9' deep truss opening (see diagram above), that's 360 sq ft; the main house truss is slightly bigger (10' opening), for a total of 440 sq ft of space; doing the math, that means the extra money is buying us about 800 sq ft of high quality storage space, at about $25 $3 sq ft.

[Edit 2009/08/10: corrected my math mistake above. Duh! Although the final price will be a bit higher than $3 bucks per sq ft, since I'm also installing plywood subflooring in the attic spaces.]

This is the on-site sanitary facility:

I tried to get my wife to go inside it for a moment (after all, it is rated for women; see the little woman pictograph above the man?), so I could take a picture (i.e., a picture of "my honey in the honey bucket") but she wouldn't cooperate. :) Ah well.

I've also been thinking more about a suggestion Paul made near the beginning of the project, to mount sprinkler heads on top of the roof for fire-protection. At first this idea seemed mildly silly to me but after some research it turns out that roof-mounted sprinklers are a widely-accepted mechanism for protecting a home against fires. I'm guessing that at least three sprinkler heads will be needed, maybe four. It's a valid question whether the well and the well pump would keep up with that many sprinklers; that said, from my research the idea seems to be to use the sprinklers to pre-soak the roof and surrounding grounds before the fire shows up, so it might work.

Remember the well? Well (no pun intended), it's still there, waiting for its turn. This is a nice view of the landscape between the well and the house:

Paul says he is nearly ready to have Brad come back out and dig the trench from the well to the house, for electrical and water (which is the point of course). At the same time, I'm thinking of having a hole dug for a propane tank. A propane tank was not included in the bid, but I'd rather get such things (that get buried in the ground) done now rather than later. Even though we are not using propane to heat the house, I'm considering either a 250 or 500 gallon tank. That would be approximately enough for several days (maybe even a week) of generator usage, depending on which generator model is chosen (haven't done the electrical load math yet); and if the generator is not needed, we'll have enough to use our BBQ grill daily for several years before running out. :-) I called several propane suppliers today and most of do not sell tanks outright, they only lease them. Trouble is, the leasing rates seemed exorbitant (eg, $200-300 a year!), and they seem to want to lock you into using them as your sole supplier. About my fifth phone call, I found Associated Petroleum who will sell me a tank outright; need to talk to Paul next week about this and see if he's ok with them.

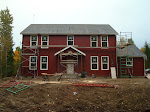
Otherwise, things are all looking good. The weather cooled down to "only" mid-80's deg F, which is a nice break. Cross your fingers that this won't jinx things, but I'm really hoping that our house can be completely framed and roofed before it gets rained on - not too many houses built in Seattle can make that claim!

Tuesday, July 28, 2009

Second floor warmboard just about done

The crew is having to deal with some very warm temps this week: mid 90's deg F, and tomorrow is supposed to reach 100, which might break a record. Thank goodness we don't have high humidity to deal with as well, but working on top of the Warmboard is bit tough on the guys. They've started coming in around 6ish to get work done before it gets too beastly.

The stairs have been completely rough-framed...

...so it's now possible to walk "upstairs". Most of the second floor Warmboard has been installed as well. The shade from the second floor sure helps keep it cooler underneath though!

Warmboard supplies these little jig tools to keep the tubing grooves well aligned during panel installation:

This is looking west, from over the living room; the small rectangular stubbed-out section of joists is the walk-in closet for a bedroom:

Here's the left-front of the house; note how perfectly plumb and square the window openings in my office are.....ah, ok I better stop beating this to death :)

Looking eastward:

We're also scheduled next week to get temporary power hooked up (the guys have been running their tools off a generator all this time). The temporary meter has been mounted...

...and a trench with three conduits has been run all the way out to the road:

The trench location is a slight alteration from the original site plan, being south of the driveway instead of north of it; Brad felt the south side was easier to excavate. I'm just happy since it means they didn't need to dig up the driveway :).

A small phone company (CenturyTel) is the carrier for this area. I knew from talking with the neighbors that DSL is available in this area, and wanted to ask about installation procedures. Paul did it the easy way though, and just laid in an extra conduit with string so they can pull whatever lines they want. If I was running the job I wouldn't have realized that that was an option.

After looking up our new address, the CenturyTel support person told me that fiber-optic service was available in this area. That's realllllllly hard to believe. So I asked her again, and she again said it was, based on other addresses near ours. Well, I'll believe it when I see it. We have fiber-optic at our current house and the move back down to DSL will be easily the toughest part of this move for me... (yeah I know - poor old suffering Jay).

Friday, July 24, 2009

Rapid framing progress

The crew is just going gangbusters on the framing, and Paul has (gently) warned me not to expect this kind of visually rapid progress during all phases of construction. We're not worried about the overall pace of things, so long as we get the house we want. Nevertheless, I have to say that this phase has been extremely exciting.

Here's a few pictures from earlier in the week; this is the south-facing wall of my office after being stood up (as mentioned before, the allowable tolerances on this very critical room are minute, so it's good that they get it going early):

Wow, there's some serious stud reinforcement around the front door:

Looking at the rear of the house; the triple set of windows is in our living room, should be a nice view from there:

My wife and I drove out to the site early this morning so we could look things over together. This was also a good chance to meet with Paul and go over some of the minor questions that needed answers. E.g., should we widen this hallway, what do you think about leaving this room transition with a high-ceiling, how about a pocket-door here, etc, etc. No major problems have arisen, and my wife and I are both thrilled with how the house and floor plan are starting to feel.

We can knock a few thousand off of the A/C bid if we can give the HVAC guys a 9" duct from crawlspace to attic (so that the upstairs rooms can be cooled by an air-exchanger in the basement, as opposed to needing an additional air-exchanger in the attic). That's a lot of incentive to find room for that duct! Currently it's looking like the best spot will be up through my closet in the master bedroom.

I also asked Paul to make sure we save room for some smaller crawl-to-attic ducting\tubing, to make it easy to low-voltage stuff in future. I also have plans to mount my digital weather station windvane on a support pipe on the roof, and Paul's fine with that; I just need to get him the pipe and let him know how high it should be. He also suggested pre-mounting the windvane and pre-running the wires down to the attic, so I won't need to climb back up there some day to do it.

We drove out to the site again after work today, so here's a few pictures of the latest progress. This is a view from the kitchen, looking west through the dining room, entry-hall and finally, my office at the far end:

Right now the crew is focusing on framing everything under the second floor of the house. The kitchen\breakfast area\laundry\pantry area is still not framed, as you can see:

This sequence of events is intentional: this way, they have something to work on while the tubing guys are doing their thing on the second floor. Good thinking ahead there...

We are really loving the look of our "three-oh, six-oh" windows (ie, 3' wide x 6' high). For a consistent look, these are placed at regular intervals all around the house on both floors. With a 9' high ceiling, these nice, tall windows will let in a huge amount of light. While some people like the humongous, super-wide picture windows, I'm not keen on them due to higher heat loss (we have kept the exterior-wall glazing ratio quite low on this house) and expensive $$ pain they cause if\when they get broken.

Here's a view of our new second floor taking shape (I'm standing on a very high ladder to take this picture):

A view from my office, looking thru the master bedroom toward my wife's closet on the left (it's huge) and the master bathroom on the right:

The door to my office from the entry-way was planned as a measley 2' 8" wide door...I'm a big guy and prefer big openings. So I asked Paul if this could be made a 3' door instead. The problem then was that the bottom stair landing would protrude past the edge of the door. Before we left this morning, Paul said he would see what he could do. This is really cool...it looks like he found a way to "push" the stairs further away from my office door, without letting the stair stringers protrude into the (visible) ceiling below:

And from the other side:

Looking from the living room diagonally back towards my office:

Phew...well that should catch things up.

Tuesday, July 21, 2009

Framing begins

The crew started framing the garage first, maybe because that is normal practice, but also because they needed to stay out of the way of the the tubing guys. I was on-site early Monday morning and was able to see the beginning of the framing process. I suspect most of this process will be boring to anyone with experience in construction, but it's interesting to me. Here's the garage rear wall getting assembled:

Since I was there, I even had the chance to help lift and hold the garage walls while they were nailed into place...woohoo! Okay, not really a big deal but at least I can say I helped raise the first walls on our new house :).

Rear garage wall is up and braced:

Installing the first beam over a stall opening; note all of the diagonal bracing to keep the walls plumb:

And later on:

Another view, with some of the interior room framing layout in the foreground:

The tubing installation guys have been working too; here's several rolls of Uponor Wirsbo 1/2" Pex-AL-Pex tubing:

"Pex-AL-Pex" means that the tubing has three layers, a core of cross-linked polyethylene (PEX), then a layer of aluminim, then another layer of PEX. IIRC, this is the type of tubing specified and approved by Warmboard. It is tough stuff. Some type of PEX tubing be also used for our drinking water plumbing.

The tubing doesn't look like much different after it's been laid into the grooves; here's a sample view:

In the above picture, you can see some custom-routed grooves, including some that were X'd out as mistakes...grrrr. :) To the right, in a circle labelled "S", you can see one tube that dives down below the Warmboard into the crawlspace. Presumably at a later stage that tube will surface into a stud wall in a different location, and be hooked up to a manifold; for now though, they just dangle patiently:

The tubing guys are not 100% finished yet, but they've got most of the western side of the house done so the framers can work behind them. This is the rear wall of the master-bathroom area:

All for now...

Friday, July 17, 2009

First floor warmboard installed

The Warmboard is all done and we're now ready for the tubing to be installed on Monday:

I'm very happy with how the Warmboard install went. Everything looks perfectly lined up and the edges are all squared off nicely with the perimeter; the crew did good work. My wife and I had fun walking around on our new floor - it feels good!

Paul had already snapped chalk lines for all of the exterior and interior stud walls, so this was also our first chance to "walk through" the house. The layout is still a bit hard to visualize, but I'm pleased so far with how it felt. Time will tell.

Our weather has been very warm lately; Paul said the crew got a bit "baked" while working on this stuff, since the aluminum layer on top of the Warmboard gets heated by the sun and then radiates upwards. I heard somewhere it was even worse when Warmboard first started to be produced (10-15 years ago?): back then, the aluminum surface was left shiny and bare, so the installation crews had to deal with the glare as well as reflected heat. Good way to get a quick tan, I bet.

This is a picture of the side-entrance porch/door area:

You can see in the middle how some of tubing grooves don't make a U-turn like you would expect. For areas like this, the tubing installers will have to route out custom U-turn channels in the Warmboard. This is normal practice since it's very difficult to have a tubing design that can be realized with 100% stock panels (even though WB does have "left turn", "double U-turns", etc, like I mentioned before). Even a perfectly square house would probably custom grooves due to zoning requirements, etc. Our house should need very few custom tubing grooves, or so I would guess; this is one of the advantages of having a comparatively simple house design. I am hoping to make it out to the site on Monday to watch some of the tubing being installed.

Wednesday, July 15, 2009

Subfloor (warmboard) install starting

It's been several days since we were out to the site, so we made a short trip out there this evening. Rapid progress has been made. The beams and joists are fully installed, and the beam\joist inspection went well. I like the results:

The crew has now begun installing the Warmboard subfloor panels. Paul has never used this system before, and so there's been some understandable apprehension about how well it would all work out. So far so good though:

The panels have been started at the southwest corner of the house; this seems appropriate since that is the most important room in the house (i.e., my office) and so it is must be perfect.

Warmboard supplies a little tool that is used to keep the tubing slots aligned from one panel to the next. Otherwise as far as I can tell the panels are simply nailed down like any other subfloor panel. I was a little upset to see some dirt on the panels though...will need to talk to Paul about making sure the crew wears protective booties to keep them clean (kidding, kidding :). There are multiple types of panels (straights, curves, doubles, etc) and part of the Warmboard package involves creating a panel layout design which suits your house and zoning requirements. Here's the first floor layout:

I've omitted the key\legend which explains which panel types correspond to the colored circles. It does looks a bit complicated at first, but after some study it all starts to make sense. There's a second view which shows the crew how to route the tubing:

The above layout shows the four primary zones on the ground floor, the garage is the fifth zone, then there are three more zones upstairs. Way cool, eh?

Paul and I had discussed a lot about the right time to install the PEX tubing into the grooves. It can be done as soon as the subfloor is installed, or it can be much later, i.e. after all of the walls and roof are on, heck you could wait until after the drywall is in! There are pros and cons each way, depending on how protective you want to be of the tubing (stuff happens on a job site, let's be honest). The HVAC contractor (Mitchell Mechanical) who will be installing the tubing preferred to get it in immediately after the subfloor is in, so that's the way Paul is going to go. Sometimes a crew will install thin sheets of masonite over the tubing to protect it, but Mitchell advised against this since the masonite tends to let folks forget that the tubing is there. In any event, while a puncture or cut in a tube is not something to be desired, it can definitely be repaired. Anyway, the tubing is tentatively scheduled to be installed on Monday.

Driving back we saw a couple of deer crossing the road; I got the camera out in time to snap a shot of the second one before they disappeared:

I commented to my wife that it would be good to have Bambi available for dinner in case times get tough, and got smacked for it. Jeez, I'm just saying it's better that than to starve, right? :-) There is a lot of wildlife up here in the woods; I've heard more than one person say something like "we're just filthy with deer up here". The road above is pretty representative of the whole area too.

Btw, in my last post there was a picture that showed a beam that had been rough-installed with supports only at the far ends...talking with Paul, it turns out this is an intentional way of trying to get some of the "crown" out of the beam: installing the beam crown-up, then supporting it only at the ends, then putting a little bit of weight on it. Which seems simple enough now, but I would never have guessed that that was what was going on.... :)

Friday, July 10, 2009

First floor beams/joists started

Not much of it has been nailed down for good, but I can see the shape of things to come:

As I recall, the first floor spans are short enough that Paul can use dimensional lumber for the joists on this floor (saves some money). Second floor has some very long spans, so that floor will get the engineered I-beam trusses (eg, "TJI"s); they are very expensive but I remember being impressed with their engineering specs back when I was researching them.

The Warmboard subfloor material has been shipped from California and will (after arrival here in Washington) will be staged at the lumber yard until we're ready to install it. Paul mentioned that a framing inspection is required before you can install subflooring, hopefully that will be next week.

One more picture of the floor framing:

As I said, not much of it is nailed together yet, but I'm sure they'll get there soon.

Thursday, July 9, 2009

Got wood?

Yep, we got wood. :)

Talking with Paul this afternoon, he says they spent most of the time setting up the job site today, but the sill plates are mostly laid down, a bunch of wood is on-site, and joists and beams should start appearing soon. This picture was taken looking northwards:

Obviously the big container is for tools left onsite and whatnot; it has a huge lock and appeared much more solid than the normal shipping container you sometimes see folks using for storage.

Here's a closer view of some of the sill plates:

Not much else to share in this post but it's good to see things are moving along.

Tuesday, July 7, 2009

Garage slab poured

Overall this process worked the same as it did for the footings and foundation: pumper truck (again from Ralph's) is on site, cement trucks (from Cemex this time) show up with cement, cement is pumped into the forms (mostly the foundation walls, in this case), then the crew works and levels the concrete, etc. Piece of cake (well, if you've done it before). Brian and his crew from Concrete Reality made this job look real easy.

Here comes the first of the mud:

The 2x4 in the above picture is resting on the foundation on the right, and on the left it's resting on a nail sticking out of a temporary stake, with the nail set at the right height to get the required drop to that point from the rear foundation wall. The garage slab was specified to drop 3" from the rear to the front wall, to encourage rain\water to flow out of the garage. In the above picture, you can also see a chalk line they struck against the foundation edge as a guide.

The crew worked roughly one stall at a time; here they're doing a rough screed to get most of the concrete to the right level and slope:

Hey this guy is leaving footprints in my slab!

Not really; actually he's "jitterbugging" the surface of the concrete; the jitterbug tool he's holding is basically a rectangular grate with handles, that he shakes into the surface layer; this depresses any large aggregate deeper into the slab, and leaves the concrete "cream" on top for better levelling later on.

The jitterbugged surface then gets an initial float:

It took about 14-15 yards of concrete for my job, which meant two trucks (each truck has a ~10 yard capacity). Here the last stall is being filled from the second truck:

(You can see a better view of the jitterbug tool to the left.)

Also, the crew was commenting on the fact that the second truck's load was "hotter" than the first, so it actually cured somewhat faster.

Paul arranged for a little bit of extra concrete so we could pour this little slab near the crawlspace access hole:

I plan to put a cot down there...it will be a fine living space for my brother Bill when he comes visiting... :)

After the initial float job was done on the garage slab, the guys took a short breather to let the concrete set up a bit. We got a short rain shower....

...which gave me a bit of a scare, thinking my new garage slab would be ruined. The crew took it with aplomb though. The rain didn't last long but the water left on the slab meant everyone had to be more patient before continuing on with the final float\smoothing jobs.

I couldn't stick around for all of the job, unfortunately. Here's the guys in the middle of the second float though:

Looking good!

Next up: a delivery of actual wood so the framing can start! We should see some wood attached to the foundation before this week is over.